Manage PunchOut connections
Edit on GitHubThis document describes how to manage PunchOut connections through the Back Office. The same data is stored in the spy_punchout_connection, spy_punchout_credential, and spy_punchout_session tables described in Project configuration for PunchOut Gateway.
Open the Back Office UI
In the Back Office, open Punchout Connections. The connections grid (PunchoutConnectionTable) lists every connection across all stores.
The grid shows:
- ID
- Name
- Protocol type (
ociorcxml) - Status
- Store
- Actions: View, Edit, Activate/Deactivate, Delete
Create a connection
-
On the connections grid, select Create connection.
-
Fill in the common fields:
Field Notes Connection Name Human-readable label. Required. Up to 255 characters. Not unique. Store Store the buyer must be logged in to. Protocol Type ociorcxml. Cannot be changed after the connection is created.Processor Plugin Class FQCN of a PunchoutProcessorPluginInterface(orPunchoutCxmlProcessorPluginInterface) implementation. The dropdown only offers plugins whosegetType()matches the selected protocol type.Active When unchecked, requests posted to this connection are rejected. Allow iFrame When checked, the Storefront emits the iframe-friendly CSP headers while the session is active. -
Fill in the protocol-specific fields, shown dynamically, when you select the protocol type.
cXML
Field Notes Sender Identity Must be unique. The buyer’s Header/Sender/Credential/Identityis matched against this value.Sender Shared Secret The secret is stored hashed with password_hash(). The incomingSharedSecretis later verified withpassword_verify().The cXML request URL is fixed at
/punchout-cxml-setup, optionally followed by a slug. To target a specific connection, post to/punchout-cxml-setup/<slug>.OCI
Field Notes Request URL A slug appended to /punchout-gateway/oci/. Only_,-, letters, and digits are allowed.Form Method HTTP method the buyer uses to submit the OCI login form ( POSTorGET).Username Field Name Form field name carrying the username; defaults to USERNAME.Password Field Name Form field name carrying the password; defaults to PASSWORD. -
Save the form. The new connection appears in the grid.
Edit a connection
On the grid row, select Edit. The form opens with the same fields as the create form, except:
- Protocol Type is read-only.
- For cXML connections, the Sender Shared Secret field is blank. Leave it blank to keep the existing secret; type a new value to rotate it.
To toggle a connection on or off without opening the form, use the Activate / Deactivate action in the grid row.
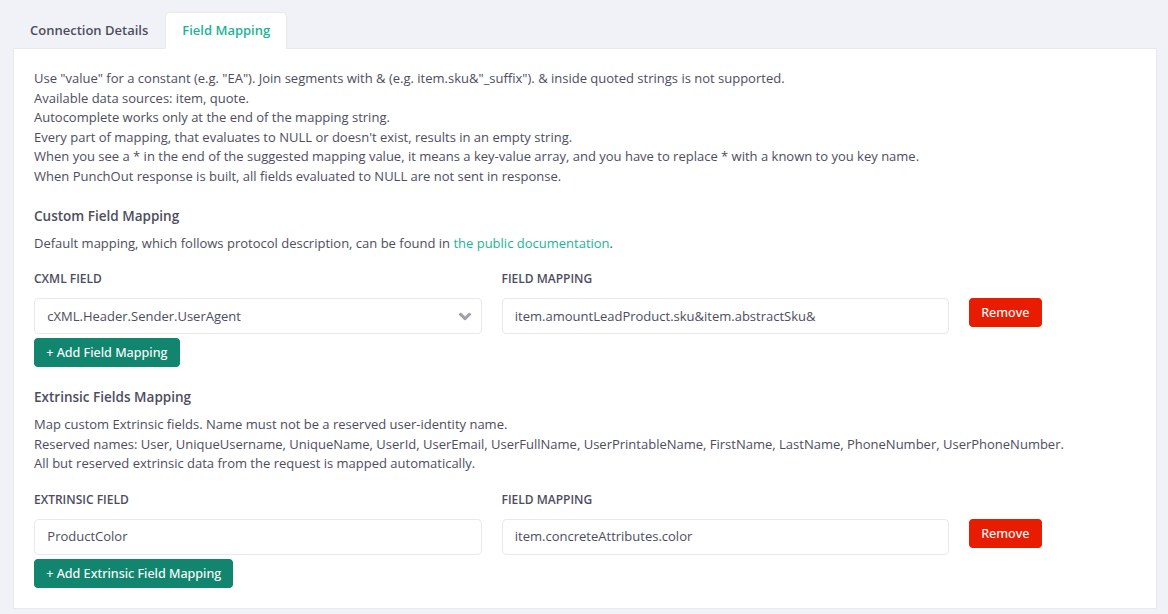
Map connection fields
When connection is created, you can provide a custom mapping.
Field mapping controls which fields of the outgoing protocol payload receive values and where those values come from.
Default mapping is explained in the Protocol Coverage documentation.
The edit form exposes two grids:
- Field mapping (cXML and OCI). Each row maps one target field to a source expression. For cXML connections, the target is a cXML element path, such as
ItemID.SupplierPartID. For OCI connections, the target is an OCI form field, such asNEW_ITEM-DESCRIPTION. Select the target from the dropdown, then enter a source expression. - Extrinsic mapping (cXML only). Each row maps a custom extrinsic name to a source expression. The shop stores the value as the
ItemDetail.Extrinsic.<name>element in the cart message.
To add a row, click one of the Add Field Mapping or Add Extrinsic Field Mapping button. To remove a row, select the row’s Delete action. Save the form to persist the mapping.
Source expression syntax
The Source field accepts the following values:
| Source value | Meaning |
|---|---|
| (empty) | The target field is skipped, and the built-in default applies. |
item.sku, quote.customer.email |
A plugin expression in the form key.field. The shop reads the value from the cart item or the quote at cart-transfer time. |
"EA" or 'EA' |
A literal constant. The quoted text is used as is. |
item.sku&"_suffix" |
A concatenation. Segments joined with & are resolved individually and joined into a single string. |
The Source field is an autocomplete combobox that suggests the available source paths as you type.
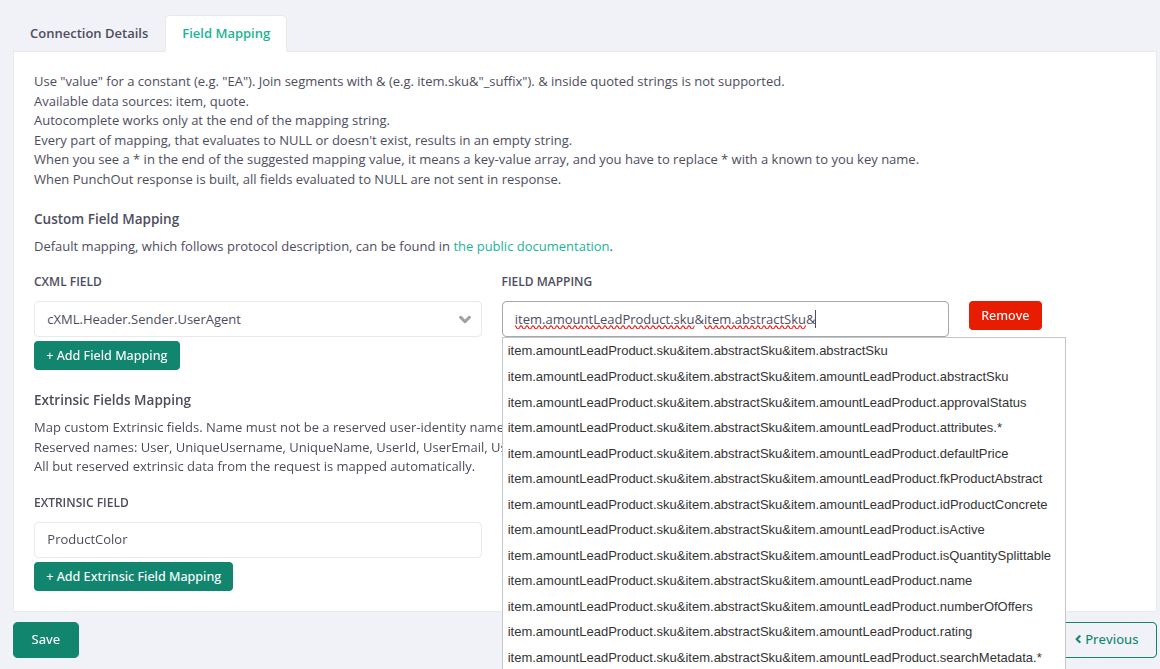
The following source keys are available by default:
| Key | Source |
|---|---|
item |
Fields of the current cart item. |
quote |
Fields of the current quote. |
Extrinsic name rules
An extrinsic name may contain only letters, digits, and underscores. Names reserved for buyer identity are rejected.
The following extrinsic names are reserved and cannot be used in a custom mapping: User, UniqueUsername, UniqueName, UserId, UserEmail, UserFullName, UserPrintableName, FirstName, LastName, PhoneNumber, UserPhoneNumber.
Defaults when no mapping is set
When a target field has no mapping, the shop applies its built-in default. For example, the OCI unit of measure defaults to EA, the cXML language defaults to en-US, and the cXML credential domain defaults to DUNS.
View a connection
The View action opens a read-only summary of the connection plus the credentials grid (PunchoutCredentialTable) for that connection. Use this view to inspect existing credentials and to add new ones.
Delete a connection
The Delete action removes the connection. The cascade deletes also remove every spy_punchout_credential and every spy_punchout_session row that belongs to this connection. Deleting a connection ends every in-flight cart that was started from it.
Manage credentials (OCI)
Credentials are required only for OCI connections. They map a username and password pair to a customer.
Add a credential
-
Open the connection’s View page.
-
Select Add credential.
-
Fill in:
Field Notes Username Sent by the buyer in the usernameFieldform field.Password / Repeat Password Stored as a password_hash()value.Customer ID The Spryker customer to log in when this credential authenticates. Use the customer autocomplete (powered by CustomerSuggestController).Active When unchecked, the credential is rejected even if the username and password match. -
Save.
Edit a credential
Open the credential row and select Edit. To rotate the password, type a new value in Password; leave it blank to keep the existing hash.
Toggle and delete
The credentials grid exposes Activate / Deactivate and Delete actions. Deleting a credential leaves the associated customer untouched.
Thank you!
For submitting the form